How to Schedule emails for sending them in future.
- Open your Google chrome or Firefox Browser and visit the Boomerang website by clicking Here.
- Once you have visited the website, click on the Install Boomerang button which is present on the website and the installation will be started.
- You will come across a couple of steps, follow those steps and your installation will be done.
- Once the installation has been completed, the next time you will open Gmail, Boomerang will be automatically enabled.
How to use Boomerang
- Using Boomerang is very easy as the interface of this plugin is very user friendly. Read the guide below on how you can use Boomerang on your Gmail account.
- Compose email like you normally do.
- On the Compose page right next to the Send button you will see a new button named Send Later. This is the button which will help you to send email later.
- Choose the date and time as per your schedule, whenever you want to send the email.
How to Remove Trojon Horse Virus
There are many ways one can avoid itself from being a victim of this malicious virus but the best is to be attentive in downloading and executing files form an unknown source or person and also doing a background check of it, if downloading from a known source. But if you have already been a victim of it then you need to take immediate steps to remove it from your drive before it creates some major problem. You need to repair and then reformat your system completely to remove all malwares which may take from several hours to several days of time.
It is quite possible that the removal has not been done properly and may lead to coming back of the virus again and again in such cases you must take stronger measures to curb this problem. Firstly you need to have anti-virus software installed in your system and that too an updated one or else they will miss the latest species of Trojan horse. Anti-virus software helps prevent the system from many Trojan viruses. Then make sure you have updated your operating system as well with all new security patches.
One may also have to install Anti-trojan programs like The Cleaner which specialize in Trojans. Once it is installed reboot your computer in safe mode and use the cleaner to clean all registries and drives for any Trojan suspected. Make sure the internet is unplugged while cleaning. Once cleaning is complete reboot the system again. After using the cleaner make sure that you have updated your operating system and have changed all the passwords. Once the system is repaired make sure to take a backup of every data and reformat the system completely.
Send Large files through email – How to Guide

You can use websites like dropbox, where you can upload files and share the link of those uploaded files to your friends but unfortunately websites like dropbox comes with some restrictions with first being not free, advertisements and less security.
Google Drive by Google is the best option to upload your files and send them to your family members, friends. It acts as a Cloud drive. Most of us are having a Gmail account, you can use the same Gmail account if you are willing to use Google Drive and with that Gmail account you will get 5GB of free space.
How to send large files through email
Follow this step by step tutorial for sending large files via email.
Step 1: First of all you need to visit Google Drive and sign in with your Google account Credentials.Step 2: Once you are logged in you can start uploading your data. Click in the upload button which is present right next to create.
While uploading any file you can view the status of the upload by looking at the status window which is present at the bottom right corner of your computer screen. You can even place more than one file for uploading at a time.
Step 3: Once the upload has been completed you can easily share them with your friends, family members or even office colleagues. Click on the Share link to set the sharing settings of the file which you want to share. You can decide if you want to make that file private or public. Click on Who Can Access under Change menu to change the file status.
Step 4: You can send the files directly by emailing them from Google Drive. In the Sharing settings menu of a particular file you will see options which will include sending file via email and via social networking websites like Twitter, Facebook.
Google Drive also comes with one great feature and using this feature you can also limit the people to only view the files and not comment or you can give them permissions to comment or edit the files.
If you want to share files of your project with your team, upload the files and grab the link and share them with your entire team. You can even use Google Drive on smartphones as it is available both for Apple and Android operating systems.
There are other websites which are similar to Google Drive but provide a little less features:-
- Dropbox :- Click here to access Dropbox
- Sky Drive Live :- Click here to access Sky Drive Live
Create Facebook Page without Name-How to Guide
If you are a Daily facebook user or a facebook addict, you might have come across some Facebook Page without Name . Well at that very moment you must have thought about how did these guys can create it. You might have even googled it , but never succeeded.
Creating Facebook Page without Name is as simple as 1,2,3 . Just be with me and by the end of this tutorial you will be able to Create one by yourself. We will be Using some Arabic characters to Create a Facebook page with no name.How to Create Facebook Page without Name?
if you have already Created a Page on facebook before than this is going to be the Easiest tutorial for you, For those who don’t have any experience in creating a page , Believe me i will keep it Simple just Follow the Below simple steps.
Step 1: Login to facebook and click on Create page or just click Here .
Step 2: Now Click on Company, Organization or Institution (Not mandatory You can click on any.) and Choose a Category, again you can choose any it doesn’t really matters.
Step 3: Now copy the below characters and paste in the place of name and Check the box which says i agree to facebook pages terms.
ٌٍٍِّّْStep 4: Click on Get Started, Give a short description and click on “Save info” now you can click on skip, skip and skip .

Step 5: With this said, We have successfully created a page , But we can see the Characters which we entered earlier, we are making a page without any name or Character. Now in admin panel, click on Edit Page > Edit Settings.

Step 6: Click on “Page info” , the first thing you will see will be the Name, Click on Edit and use your Backspace key to Delete everything from the box.
Step 7: Click on Save Changes. If you have done all the steps as explained then you must not get any error.
Step 8: Click on View page to check your Facebook Page without Name.

Step 9: Upload a profile picture and Cover photo if you want. Now its Time to Show your Page with No name to your Friends. Try it by Yourself While its Still working.
Check the Demo of the page which I Created just now while writing the tutorial HERE and Click here To check the page which is about a month old.
How to Block Websites on your Computer
There are certain Tricks to block a website from opening on your system :
Method 1 : Using Windows host file
For this method , you don’t require any additional software
to be installed on your computer. All you need is a little bit
knowledge and some basic file editing capability using notepad. Windows
has this host file to map the ip addresses and host names of the host sites to your computer.
By using this trick you can make your computer to redirect again to your local machine instead of opening that host site. So for blocking any website using windows host file you need to follow some steps as given below :
By using this trick you can make your computer to redirect again to your local machine instead of opening that host site. So for blocking any website using windows host file you need to follow some steps as given below :
Step 1 :
Open “C:\Windows\System32\drivers\etc” in the Windows search bar or navigate to the folder by clicking your way through Windows Explorer.
Step 2 :
Now after reaching to this path you will see a file named Host. Right click on that file and click on open with notepad.
Step 3 :
In Notepad, you will see several lines of text used for
mapping purposes. Go to the last line of text (it should say something
regarding a local host), now press enter to move the cursor to the end
of the file then type “127.0.0.1″ (without codes)and press the spacebar.
Step 4 :
Now, type the specified address of the website you wish to
block on the same line. For example, type “127.0.0.1 www.reddit.com” ,
“127.0.0.1 www.facebook.com” to block all these sites.

Step 5 :
Now Save this file and ignore if you receive any messages showing you warning about this modifications.
Step 6 :
Go to your browser and verify that the site you want to block isn’t opening anymore.
Method 2 : Using control Panel
If you don’t wish to block sites using this host file or
there is some problem in modifying that file , so you can do the same
thing using another default function of windows i.e. Control Panel
Parental Control.
For doing this , just follow a few steps given below and you are done :
Step 1 :
Click on start button > Go to control panel > User accounts and Family safety > Set up parental control for any user.
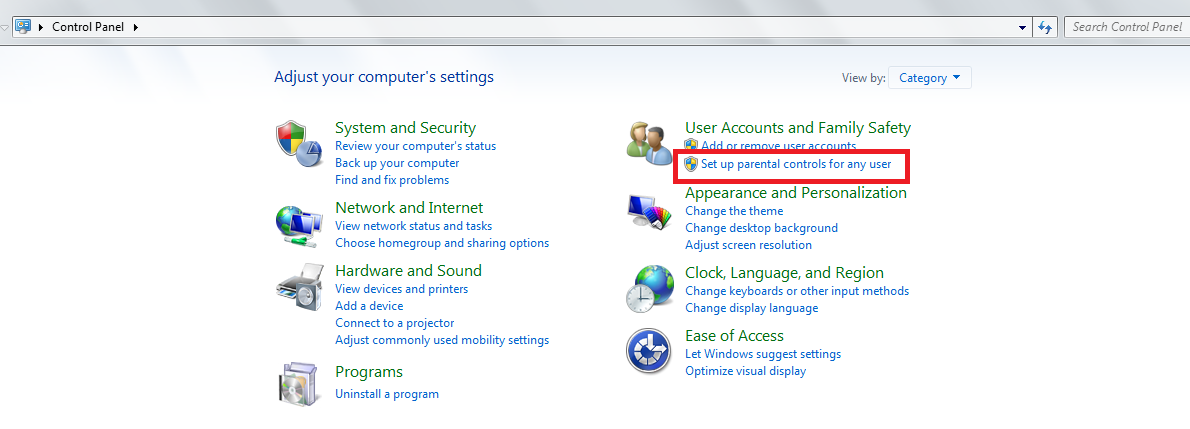
List of all the users in your system will be displayed .
Step 2 :
Now select the account for which you want to set the web filter and then under parental controls , click ON.
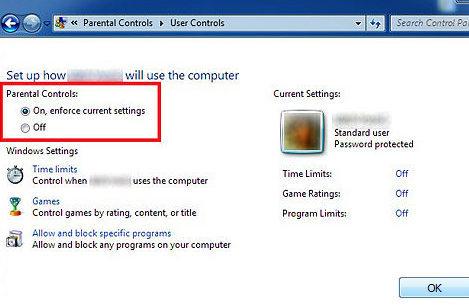
Step 3 : Click on web filter.
Step 4 : Click on Block some websites or contents .
Step 5 : Click on Edit the allow and block list.
Step 6 : In the Website address box, type the address for the website that you want to allow or block, and then click Allow or Block.
How to Create Windows 8 Bootable Pendrive:
Step 1 :Download Windows 7 USB/DVD download tool and install it.
Step 3:Now select whether you want to create a bootable DVD for windows or you want it to be a bootable pendrive. Here you need to select USB device because you want to make bootable pendrive.
Step 4: Browse and select the pendrive which you want to make bootable. Make sure that the pendrive has atleast 4 gb free . Now click on Begin Copying.

Step 5:
Once you begin copying , the tool will start creating bootable Windows 8 USB installer flash drive using the Windows 8 iso. Let this process complete , lastly when you see the message “Bootable USB Device created successfully”, you can restart your PC and boot from the USB drive.


No comments:
Post a Comment